Friday, September 30, 2016

North Sea school box build 3, secret compartment.

The original design calls for a movable partition (at least that's what it is called in the book).
I have never really understood the idea of it, and never liked it much either.

I figured that it has been a while since I have made any secret compartments, and this project can easily accommodate one.

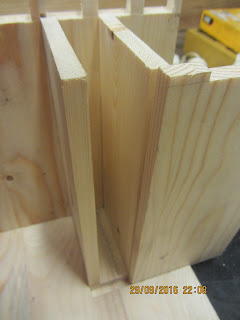
The design is similar to a secret compartment I saw in a blanket chest article some years ago. The idea is to make a small fixed interior till wit a secret compartment below it. To gain access, one will have to lift up the vertical part of the till.

I first laid out the positions of the parts of the till and the extra space below it. I then used a batten to help guide my Japanese saw when sawing out the sides of the grooves and dadoes.
The bulk of the waste was removed using a chisel, and my small homemade router next ensured a consistent depth.
To avoid the possibility to accidentally pulling out the front of the till, I made some deeper dadoes for the lower part of it. The front itself has got two small protrusions that will fit in there.

To determine the actual length of the till parts, I made a dry assembly of the box and took the measurements directly from it.

After processing those parts, I made another dry assembly to check if all worked as it should.
The system is OK, but I need to make a small chamfer at the ends of the till bottom and the secret compartment bottom.

When that is done I guess the next step is to sand the box lightly on the inside to remove some of the grime that almost inevitably comes from working in an engine room workshop, before gluing up the case.

Finding the correct length.

The layout of the secret compartment when closed.

The secret compartment opened.

The deeper dado and the protrusion on the front of the till.

Dry assembly closed.

Dry assembly opened.


Thursday, September 29, 2016

Broken metal plane repair

Yesterday we were in port, and most surprisingly it didn't rain. We are in Bergen, and on an average it rains here 400 days per year (or there about)..

After realising that it was 22 years ago I had last done any brazing/welding of cast iron, I decided to read up a bit on the subject. Basically the advice was to:
1) Use a flame with oxygen surplus.
2) Preheat the parts to 350 - 400 dgC.
And off course the usual stuff about chamfering and how to hold the flame (15-30 degree angle).

I mounted two pieces of angle bar in a vise on the deck. One would hopefully keep the sole falt, and the other should keep the plane aligned sideways.

A fairly important trick for cast iron is to first use a flame (oxygen surplus) directly on the crack, to burn away any carbon deposits.

After this I did my best to preheat evenly to 400 dgC. I then started brazing with a special filler material intended for cast iron. The biggest challenge was that I couldn't flip the plane on the side to do the major parts of the crack, and this particular type of filler works best if applied on a horizontal piece.
I did the best I could, and at a point I decided that I couldn't do much more.

The next suggestion from the welding handbook was to let the item cool slowly packed in dry sand or in some insulation material. I elegantly skipped that part and just reduced the intensity of the flame and heated a bit on the plane now and then till I reached 150 dgC.
After that I just let it cool down.

Once cold I rinsed it off in water and took it to the workshop.

The sole had a cup in the middle, so I flattened it using a file and later some emery paper. It still has a small area behind the mouth where it is possible to slip a piece of paper under. But I think it might be OK despite that. If not I'll just flatten it some more later.
Sideways it was also a bit off, but it was mostly on the forward most part of the plane. I flattened until I could see that the nicker was in line with the aft part of the plane, and then I stopped. I have never used the plane with the blade in the forward position, and I doubt I ever will, so no need to fuss to much over it.

The conclusions to the project:
By using the cast iron filler instead of the bronze filler, the repair job is a little bit more hidden, and a bit stronger.
The structured original paint of the plane is destroyed. And the entire plane needs to be washed again because it makes your hands dirty when you try to hold it.
It is possible to repair a broken cast iron plane. BUT it is better if you don't drop it in the first place!

Plane positioned on angle bars. 

Chamfered crack.

Burning away the carbon deposits.

How I checked the temperature (this is cooling down).

First shot of the repair job.

Flattening the sole, pen marks show my progress.
I did flatten it more, but didn't take more pictures.

Light colour shows where it is flat.

Repair job on the inside.


Saturday, September 24, 2016

Plane crash

Yesterday my moving fillister plane got a little bit wet. I tried to wipe it off, but I decided that it would be better to place it on top of one of the transformers, so it could dry completely.
I forgot to take it down when it was dry, but the always cooperative gale stricken North Sea helped me with that today.
Go figure if an old cast iron plane survives a fall from 4 feet onto a steel floor undamaged?

Nope, no chance of that happening. The plane is broken in two.

I need a little time with either calm sea or alongside in a place where we are allowed to do hot work to try to fix the plane.
My plan is to braze the two parts together. In order to do that I am going to chamfer the sides of the broken area and line up the parts before brazing.

With a bit of luck I should be able to get the plane back together, and then it will be a matter of some work with a file to make sure the sole is level again. The blade also took a hit, so there's a nick in the cutting edge. But if everything else goes as I hope, that will be a minor challenge.

If only I had observed the 7P's as described by Ralph the accidental woodworker this would not have happened.

The crashed plane.

Friday, September 23, 2016

North Sea school box build 2, dovetails.

We have been fairly busy, so I haven't made a lot of progress on the school box, but every little bit helps, however slow it may seem.

I flattened the glued up panels and ripped them to the correct height. Then I crosscut them to the correct length and planed them all at once to make sure they all got the same height.
Once that was done I use my shooting board to square up the ends.

I like to use the "rabbet on the tailboard trick" when I dovetail, because it helps to get a nice appearance on the inside of the joint.
After making the shallow rabbet, I used the remaining thickness as a guide for the marking gauge and marked out the length of the pins on the pin boards.

The pins were laid out using a divider, and I marked the angle using a small cardboard template. the slope is 1:6.

I clamped the pin board to my 5x5 work holding stick, and started sawing.
When I was done with the sawing and getting ready to chop out the waste between the pins, I noticed that the end boards had become rather dirty. Apparently someone has used the 5x5 for something that involved a mix of soot and grease.
The dirty spots are on the inside of the boards, so I hope that I will be able to remove them by sanding.
I might have to try to dress the 5x5 using my plane, to remove the dirty parts. That will be easier and better than messing up the rest of the build.

One of the pins were placed exactly on a knot. That meant that half the pin fell out as soon as I had sawed the sides of it. The good thing is that this is one of the lower pins, so I'll just make sure to make the skirt high enough to cover the inevitable hole resulting from half the pin missing.

Flattening an end board.

Planing all parts to the same height.

My shooting board set up.

Sawing out the pins. Notice the dirt on the 5x5.

Sunday, September 18, 2016

Epitaph to a dog

Thursday our Newfoundland dog Fnug was taken to the veterinarian since she all of a sudden couldn't move her aft body
The vet examined her and the verdict  was a heart failure. This was completely unexpected to us.
She was given medication, but to no help, so she was put to sleep in the evening.

No one has described loosing a Newfoundland dog better than Lord Byron in his famous poem "Epitaph to a dog" The first part of the poem is written by Byron's friend John Hobhouse.

Near this Spot
are deposited the Remains of one
who possessed Beauty without Vanity,
Strength without Insolence,
Courage without Ferocity,
and all the virtues of Man without his Vices.

This praise, which would be unmeaning Flattery
if inscribed over human Ashes,
is but a just tribute to the Memory of
Boatswain, a Dog
who was born in Newfoundland May 1803
and died at Newstead Nov. 18th, 1808


When some proud Son of Man returns to Earth,
Unknown to Glory, but upheld by Birth,
The sculptor’s art exhausts the pomp of woe,
And storied urns record who rests below.
When all is done, upon the Tomb is seen,
Not what he was, but what he should have been.
But the poor Dog, in life the firmest friend,
The first to welcome, foremost to defend,
Whose honest heart is still his Master’s own,
Who labours, fights, lives, breathes for him alone,
Unhonoured falls, unnoticed all his worth,
Denied in heaven the Soul he held on earth –
While man, vain insect! hopes to be forgiven,
And claims himself a sole exclusive heaven.

Oh man! thou feeble tenant of an hour,
Debased by slavery, or corrupt by power –
Who knows thee well, must quit thee with disgust,
Degraded mass of animated dust!
Thy love is lust, thy friendship all a cheat,
Thy tongue hypocrisy, thy heart deceit!
By nature vile, ennobled but by name,
Each kindred brute might bid thee blush for shame.
Ye, who behold perchance this simple urn,
Pass on – it honours none you wish to mourn.
To mark a friend’s remains these stones arise;
I never knew but one -- and here he lies.


Fnug having tested if the paint of a door was dry.

Fnug in Danish means "a flake" like a snow flake or some very small piece of dust etc.

Saturday, September 17, 2016

Are we doing enough to help new bloggers?

This post is fuelled by my bad conscience and some comments from my last post.

It seemed that there is a general sense of more blogs closing down compared to new ones surfacing. This discussion got plenty of really thoughtful comments.

Some of the comments made me sad. Not because they were written in a harsh language or were rude in any way, but because they were from people who had experienced so little interest in their blog that they decided to shut it down.
I think that all people deserve a chance, and one of the comments was that some of the more established blogs could be better at promoting new blogs.

That particular comment was spot on regarding my blog. (Not that my blog is the most read or best established). But I have a pretty short list of blogs that I follow compared to many other blogs.

My thoughts regarding this list have always been that I couldn't honestly claim to follow a list of 50 blogs. Those that are on the list I really do try to read whenever I have switched on a computer.
I guess that back when I started the blog I also thought the blogs that I read would sort of "define me" in the woodworking community. Kind of similar to what car you drive and what music you listen to etc. - rather childish when I think about it, but it is the fact.
Besides, if I stated that I read a blog, I felt like I should be able to recommend it. If I didn't like to read it, then I probably wouldn't recommend it. Because I was afraid that if someone followed one of my leads to a blog and those people didn't like what they read, well, then maybe they would take me for a total untrustworthy fraud. So sticking to a couple of proven blogs and a few new ones seemed like a safe bet.

But.. I do read other blogs too, and some of those are well written and informative, but I just never seem to get around updating my blog list, also due to my idea that I should really read the ones on my list.

I remember back when starting my blog, if a "real new person", i.e. not one of your close friends, but someone you had never met commented on you blog. That feeling was fantastic. And the first time your status system revealed that a couple of readers had found you from another real woodworking blog. Not some shady pizzaunderwearexoticdate.com robot site. When you clicked on that link and saw the name of your blog mentioned in someones blog list - wow it was just like having the correct answer in chemistry class.

I would like other bloggers to experience that feeling, so I am going to make a new list on my blog called "blogs you should try to read". And I'll try my best to become better at updating this list, and comment on not so well established blogs.
If by doing that I can make someones day a bit brighter - well then it has all been worth it.

Being on one or the other of my blog lists shouldn't be seen as a quality stamp or lack of the same, but merely a fact concerning how often I have read it
So please don't feel offended if you blog appears on the "blogs you should try to read" list. It is NOT my way of pointing out which blogs are more established than others.


Wednesday, September 14, 2016

Where have all the bloggers gone?

I get most of my information on new blogs from either Unpluggedshop.com or from Norsewoodsmith.com.
I also have a blogroll on my own blog, and I usually look at the blog rolls of the other woodworking blogs I visit.
But it seems to me that there are a bit fewer entries per day on e.g. unpluggedshop and norsewoodwmith compared to say two years ago.

I forgot to mention Woodspotting.com which is also a hand tool woodworking blog aggregator. Sorry Siavosh for forgetting your page, but it had just slipped my mind.

The other day I tried to look at the Popular woodworking blog network. A few clicks gave me blogs that hadn't been updated for a long long time. A couple with the last update in the spring of 2015, one from 2014 and one last updated in 2012.
I know that Popular Woodworking don't accept brand new blogs on their page, to avoid the "here today gone tomorrow blogs".
I know that life itself is infinitely more important than maintaining a blog, but those were all blogs that had a proven record. So I am not talking about blogs that were started, had maybe a couple of months of entries and then shut down. But instead of blogs that had been going on for at least a couple of years with a regular flow of entries.

Off course some bloggers stop due to change in interests, or changes in life such as moving or new jobs etc. But maybe it is not the only thing that is happening?

Is Facebook taking over? Google Plus? Instagram? or some other places like woodworking fora's?
And why? Is it easier to make an entry? More response from other people? Easier to comment on?
Friendlier climate?
Maybe I shouldn't care about it, but I am a bit curious.

My own answers to why I am here is: Because I haven't got a Facebook or an Instagram account. And I like blogging because of the response from other people. I like that I can have as much text or as little text as I choose, and the same goes for the amount of pictures.

So please let me hear your comments on this one.

Tuesday, September 13, 2016

Danish rocking chair with rocker bracket.

Our oldest son Gustav took some pictures of our rocking chair, and sent me the pictures. That helps a lot in explaining how a rocker using the IPA rocker spring looks.

I don't know who has made the rocker itself, but I know that Mettes grandmother made the upholstery. So I guess that once you could buy those rockers and finish them yourself.
There are a lot of similar old rockers for sale in Denmark, so maybe a company produced them, or you could make one yourself using a set of drawings.
I have seen a little variation in how the legs are attached to the lower platform, but apart from that they all sport a lot of bulbous turnings everywhere.

I would like to make a newer version of this chair, without all those decorative turnings. My chair should also have a curved lower platform, where the platform ant the actual rockers were mirror images of one another. The back should sort of flow from the rockers instead of being planted like it is on the old chairs. The armrests should also be a bit more integral

A fine thing about this idea is that the rocking motion won't mar the floor and the rockers can be kept fairly short, so the chair don't take up that much space.
The chair is comfortable to sit in, so it is just the design I don't completely agree with.

Danish type rocker, matching stool next to the door.


Fancy turnings.

The fabled IPA rocker spring.

Complete under carriage, with 2 springs.

Monday, September 12, 2016

North Sea school box build 1, stock preparation.

Toolerable informed me that there is an event going on at Reddit called the Popular Woodworking School box build.
The rules state that to participate you have to live in the US. Now I haven't got a Reddit account and I don't live in the US (though I would like to), but that shouldn't stop me from participating a bit on the side.
I considered enlisting in the build and offering any eventual prize to someone in USA, but I figured that it might add a lot of unnecessary clutter for the organizers, so I'll just build the school box for the fun of it.
If you happen to be eligible to participate in the build I strongly urge you to do so. It is only through participation that the organiser(s) will be able to attract support from sponsors.
It might also be the only sort of recognition he or she will get, signalling that all their efforts in organising an event is appreciated.

True to my tradition of North Sea builds, the materials are limited to whatever I can find on board i.e. pallet sides or regular pallet wood.
I have got some regular butt hinges in my small stock of materials, so I'll have to make the box without the original type strap hinges. Unless I make some myself.

Whenever I am out here, I normally bring a couple of books with me. One or two novels, and one or two books on woodworking. This time I have brought with me "The joiner and cabinetmaker", so I ought to be able to pull off a school box build.
As a side note, I have decided that I should try to read something written by Thomas Mann, so I have brought Buddenbrook and Felix Krüll with me. I have to confess that it takes a while to get used to his style of writing.

I have found a set of pallet sides that will do for stock. It is a new style that I haven't seen before, instead of one wide board of 7.5", it consists of two boards half the breadth. This means a bit more gluing, but the boards look straight and without any major knots in them.
First I removed the hinges and separated the boards. They have been held together using some large clamps similar to those used for making large cardboard boxes.

Due to my limited shop size, I can't do too long a glue up. So I made two pieces the length of one side and one end of the school box plus one glue up the length of the lid and the bottom.

Stock preparation might not be the most fun part of the build, but I feel fine that I have finally started building something out here again.

This might turn into a school box

Glued up panels.


Wednesday, September 7, 2016

I have a hardware problem

I have read once in a while, how some people think they  have a sharpening problem. Not that they are not good at sharpening, but they tend to do it so much that they sort of become obsessed about it.

Well, I am afraid that I have the same problem regarding hardware or more precisely hardware catalogues.

The small barn I am building will require some windows and also a door. Not surprisingly I intend to make those myself. A thing I will not make myself are the hinges and the locks etc. I won't be making the glass either by the way.

We happen to have two hardware manufacturers in Denmark that I know of. They both produce pretty much the same stuff, but one of them seems to have a bit broader selection. It is also the one that is closest to my home, just around 50 miles (80 km).
A/S J.Petersens Beslagfabrik
It is a factory that is run by the third generation of founders family.

They have a catalogue, and I just can't stop flipping through it, amazed at the different types of speciality brackets and hinges that are available. (The full catalogue doesn't show up in the English version of the home page, but there are some parts of it that does.)

My problem is that I end up not looking for hardware for a project, but often instead dreaming of projects for a piece of hardware.

I have purchased some of their hinges once in a while, and they are of a solid quality. So far my favourite item is the "lemmehank" which I used as handles for my Roy Underhill joiners toolchest.

 I try to avoid their homepage as much as I can because I end up spending way too much time dreaming.
This time what got me started was a thought about maybe building a rocking chair for the DCBE. Rockers can sometime mar the floor, but luckily IPA brackets have a solution for that.
The rocker spring.

The idea is that instead of rocking directly on the floor, you make a level platform and attach a rocking chair on top of it. The rockers can be fairly short, like 20".
A set of these brackets is mounted inside at the lower part of the rockers, and will keep everything in place.

We have a rocking chair at home like that, so I'll try to get Gustav to take a picture of it so I can show the principle.

One day I think I'll make a rocker just for the sake of supporting the continuous production of this fairly obsolete piece of hardware.

Does anyone have a similar hardware problem?

Friday, September 2, 2016

Danish Chairbuilding Extravaganza 2.

During my next home period, Brian Eve from Toolerable and me are going to host the 2nd Danish Chairbuilding Extravaganza.

We have invited a couple of more guys, so totally we should end up being 6 persons.
My shop isn't so large that 6 people can fit comfortably inside, so the plan is to move the workbenches into the stable, and then we'll use the workshop as a machine shop, since that happens to be where the machines are already positioned.
Last time I think we only used the band saw and the lathe, so I doubt that we are going to use much more machinery this time any. But the machines, the dust and the noise will be in a separate location which will probably please the horses, since they are going to be in the stable with us.

Before everyone arrives, I am going to empty all the boxes completely and make a new layer of bedding for the horses consisting of saw dust from the saw mill.
I also intend to whitewash all the walls at the same time.
This is actually something that I do every year, but this time it will coincide with using the stable as a workshop, so a bit of fresh lime on the walls and a fresh smell from new sawdust should be nice.

I have to start thinking of what type of chair I am going to try to build this time. So I'd better start drawing some sketches.