Sunday, May 22, 2016

Guitar shaped cutting board

Asger likes to play the guitar, and we talked about making a gift for his guitar teacher, since he is a really nice guy and incredibly gifted when it comes to teaching children.

Given that the teacher is a professional musician, we agreed that making a guitar shaped cutting board would be a fitting gift.

I found an old piece of an elm slab, that wasn't quite big enough for a chair, and we sketched a guitar body on it. We talked about making a small neck for it as well, but we agreed that it would just get in the way when he had to use the cutting board.

After sketching,which was done by tracing the outline of an acoustic guitar, I sawed out the shape with the band saw.

The guitar shaped slab was then placed between the dogs on his bench. We used a scrub plane for traversing to reduce the thickness. I helped a bit since the elm is fairly tough. When the back side was reasonably flat, we moved on to a No 4 smoothing plane. We flattened the piece further by going diagonally and finished off going with the grain.

After that the upper side was treated in the same way.
We didn't use the thickness planer because the board was too wide, and I wanted Asger to really feel that he did the job himself.

The curved sides were sanded using the hand held belt sander, and then followed up by hand.
The edges were also broken by means of sandpaper.

Asger used a brander to write: TO SIMON FROM ASGER (In Danish) at the end of the cutting board.

As a finish we used the wood wax from Dictum and applied it using a small piece of rag and followed by a pollisoir from Don Williams  The elm looked spectacular after that treatment.

The finished thickness was around 1 5/8".


The proud craftsman with the guitar shaped cutting board.

Sanding the sides/edges.

Breaking the edge

Using an electric brander.

Using a pollisoir is hard work.


Sunday, May 8, 2016

Stanley No 12 blade holding screw

Brian Eve has bought himself a Stanley No 12, and the screw for holding the blade is bent.

He says that it still works, but it doesn't look too pretty. We have discussed the possibility of straightening out the thread, but in my experience those projects never work out really well.

So I offered that I could try to make a new screw for him on the lathe.
It greatly helps that the original is made out of brass, because turning stuff in brass is kind of like whittling away in balsa wood.

What doesn't help the project is that there seems to be comparatively little information on this particular screw regarding what type of thread it really is.
I compared Brians measurements with what information I could find, and I landed on a 5/16" 20 TPI (this time it is threads per inch, not teeth per inch as in a saw).

My next problem was that I have no idea if Stanley used the Whitworth system of 55 degrees threads, or if they used 60 degrees like metric standard thread.

A bit more searching on the Internet, and I decided that the American industries from a very early point liked the idea of having 60 degrees threads.

So armored with this information, I cranked up the lathe and made a screw.

Since I am in the middle of the North Sea, and the plane needing the screw is in Munich, I can't tell  if it was a success or not. We'll have to wait until I get home and can send the screw for actual testing.

But personally I think the screw looks nice, and I got to practice cutting threads on a lathe so that makes it a nice little project.

Stanley No 12 blade holding screw.


Friday, May 6, 2016

Carved name sign for Milo

Gustav or middle son was offered to ride a pony by a breeder. This is an excellent pony that is capable of jumping far higher than our old pony.
Our old pony was sold due to the fact that Gustav wanted to move on to new challenges and I was very proud that someone thought that highly of his skills as to offer him a pony to ride.

The deal is that he can ride the pony, and we'll feed him and pay the farrier etc.
A pony of this caliber would be out of the question if we would have had to pay for it ourselves. And I know that one day the breeder might choose to sell the pony which is perfectly OK, because she will probably have another pony ready at that time that he will then hopefully be offered instead.

With Milo now in our stable I felt obliged to carve a name sign for him like I have done for our other horses and ponies so far.

I didn't have any nice boards left from the pilot ladder that I used for the last name sign, so I had to settle for a spruce board from a pallet.
The carving turned out OK, but the difference in color of the grain makes it hard to see the outline of the horse. I think this will improve if the sign is painted or maybe just varnished. I will discuss it with Gustav and then let him decide.

I used my usual technique for the letters, but instead of carving the logo of the New Forest ponies I opted for a silhouette of a horse that is jumping. The logo of the NF ponies looks kind of like an atomic cloud to me, so that's why I didn't choose it.
For some reason there is a larger distance between the L and the O than with the rest of the letters. I think the problem is that the L has sort of an open side and the O can't "intrude" that space. But It is how the name came out of the printer.


The layout.

The third board from the left looked fine to me.

Tools used for the carving.


The completed sign.

Close up of the horse silhouette.


Tuesday, May 3, 2016

Portable tool chest, review after 1 year of travelling

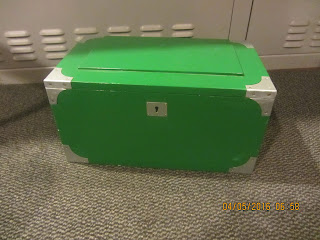
It is a little more that a year ago since I finished the green tool chest that I bring with me on the ship.

I have brought it back and forth in my bag/suitcase every time I signed on and signed off.
So I feel that I am able to give an honest review of this type of tool chest if anyone feel the need to make a small chest to accompany them on their travels.

My tool chest measures 16" x 9.5" x 8.25" (length x width x height), so it will not fit very large tool inside.
The corner reinforcements were made out of some old sheet metal that we had lying around. They have succeeded in keeping the chest free from damage despite it being thrown around by baggage handlers in various airports. In addition to that, I also think they look good.

The bottom is the weakest link in the tool chest. I wanted a clean look of the outside of the chest, so the bottom was simply nailed on inside a rebate. I never added any nails from the outside, but so far I have only noticed one or two nails starting to creep out, but a light tap of a hammer brought them back in. So unless i load it with lead ingots, I suppose it will be fine.

I really like the two tills that sit in the top of the chest. The smaller one was originally intended for a pencil, but it has been filled with hinges, screws, nails and locks instead.
The larger till is sufficiently large to accommodate my three chisels plus stuff like my oil stone and the marking gauge.

The shooting board doesn't see much use, but that is because I have taken a fancy in making stuff with sloping corners and other shapes. But when I need a shooting board it is nice to have. 

The lower part of the chest which is the main room has got just enough space for my plane and the two irons for it. A mallet, a small dozuki, a grooving plane and a moving filister plane. Until a week ago there was also a small jar of glue that had survived almost two years of travelling before finally giving up.

I have discussed the tools inside previously, and the only addition since then is a moving filister.

As it can be seen, there are no lifts on the chest. I really don't think they are necessary given the small size of the chest itself. It is so easy to just wrap an arm around the chest and carry it around. I think that while lifts can look fine they would distract from the clean look on this chest. they would also add some weight which is not a good thing for airline travel. 
Totally I think the chest including contents weighs something like 26 Lbs.

For a travelling tool chest that needs to handle all the tools you really need, you would probably have to make it a wee bit larger. That would be to accommodate a larger saw and a hammer. Those tools I normally borrow from the ships workshop, so I don't really need to bring them myself.

A solution to the saw could be a frame saw that can be taken apart, and having one crosscut blade and one ripping blade.

I haven't been stopped by custom officers yet and had to explain the tool chest to them, but I suppose it should be OK.
If you travel between countries that have strict regulations concerning bringing items made out of wood across the border, it might be best to tick off that box on the declaration board and avoid getting into trouble for forgetting it. 

The little I know about wood products crossing borders, is that they tend to be mostly concerned if the bark is still on the wood. Or if the wood is attacked by insects.

Green travelling tool chest.

Lid open.