Tuesday, December 9, 2014

Maritime woodworking tools.

The title may be a bit misleading, because it is not about tools used to build maritime stuff, rather than tools I have used the past year for hobby woodworking on a ship.

As some of you may remember, I made a tool chest for the sea last year. During the last year I have built a couple of projects using the tool kit, so I feel that I can give an honest review of it.

The projects I have built have all been limited in size to something that could be transported as luggage on an air plane. The following is a list of the projects I have made on board. Some of them I finished at home, because I don't like to leave a project on board when I go home.

Seaborne chest
Cabinet with many drawers
A carved name sign
Fairy tale princess bed
Tumblehome sea chest.
The recent carved sign for Aslan Fenix
A Gerstner inspired tool chest.

We are only signed on for 4 weeks at the time, and things really have to go smooth for me to be able to finish a project in that time. sometimes we are prevented by the weather or fatigue, so woodworking out here for me is something I do to relax and get my mind to slow down. The process out here really is more important than the result.

The tool set I bring with me is stored in a home made tool chest. Due to the fact that it needs to go in my suitcase on the air plane, this chest had to be light and not too big.
I made it out of 5/16" thick larch that was dovetailed together. The top and bottom are made from 6mm birch plywood.
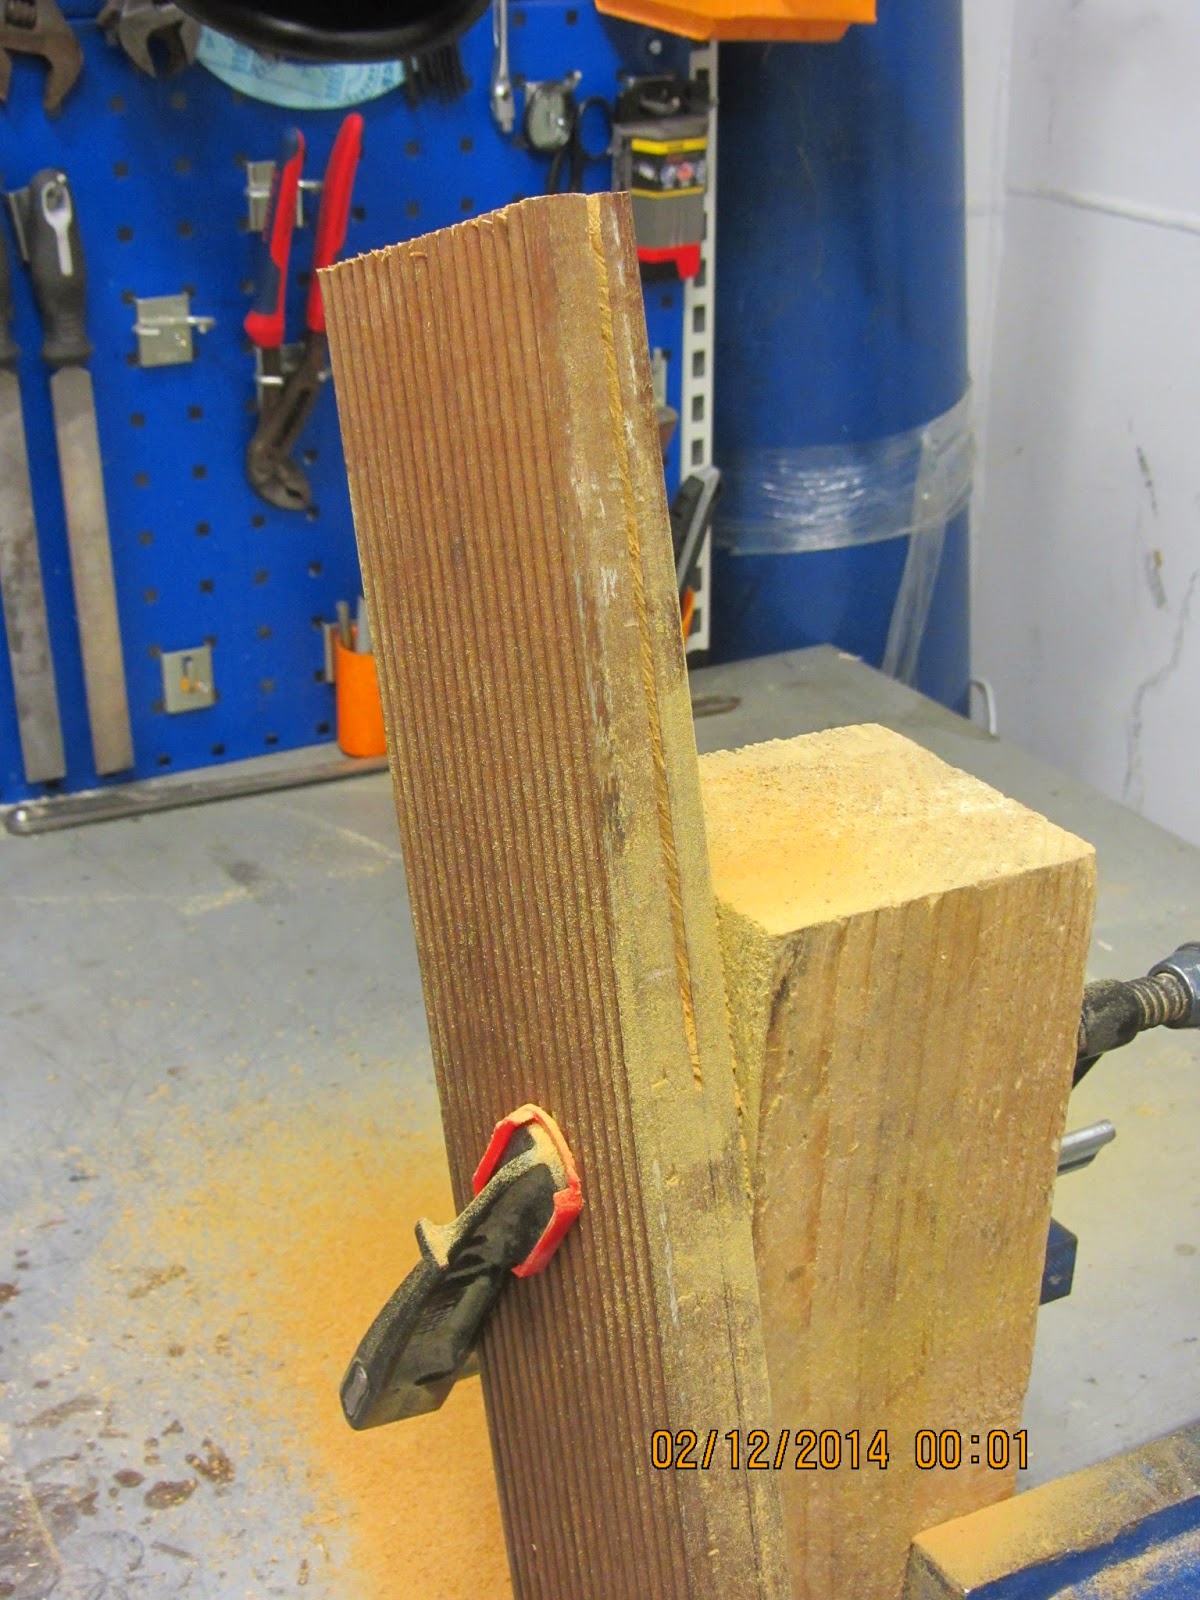
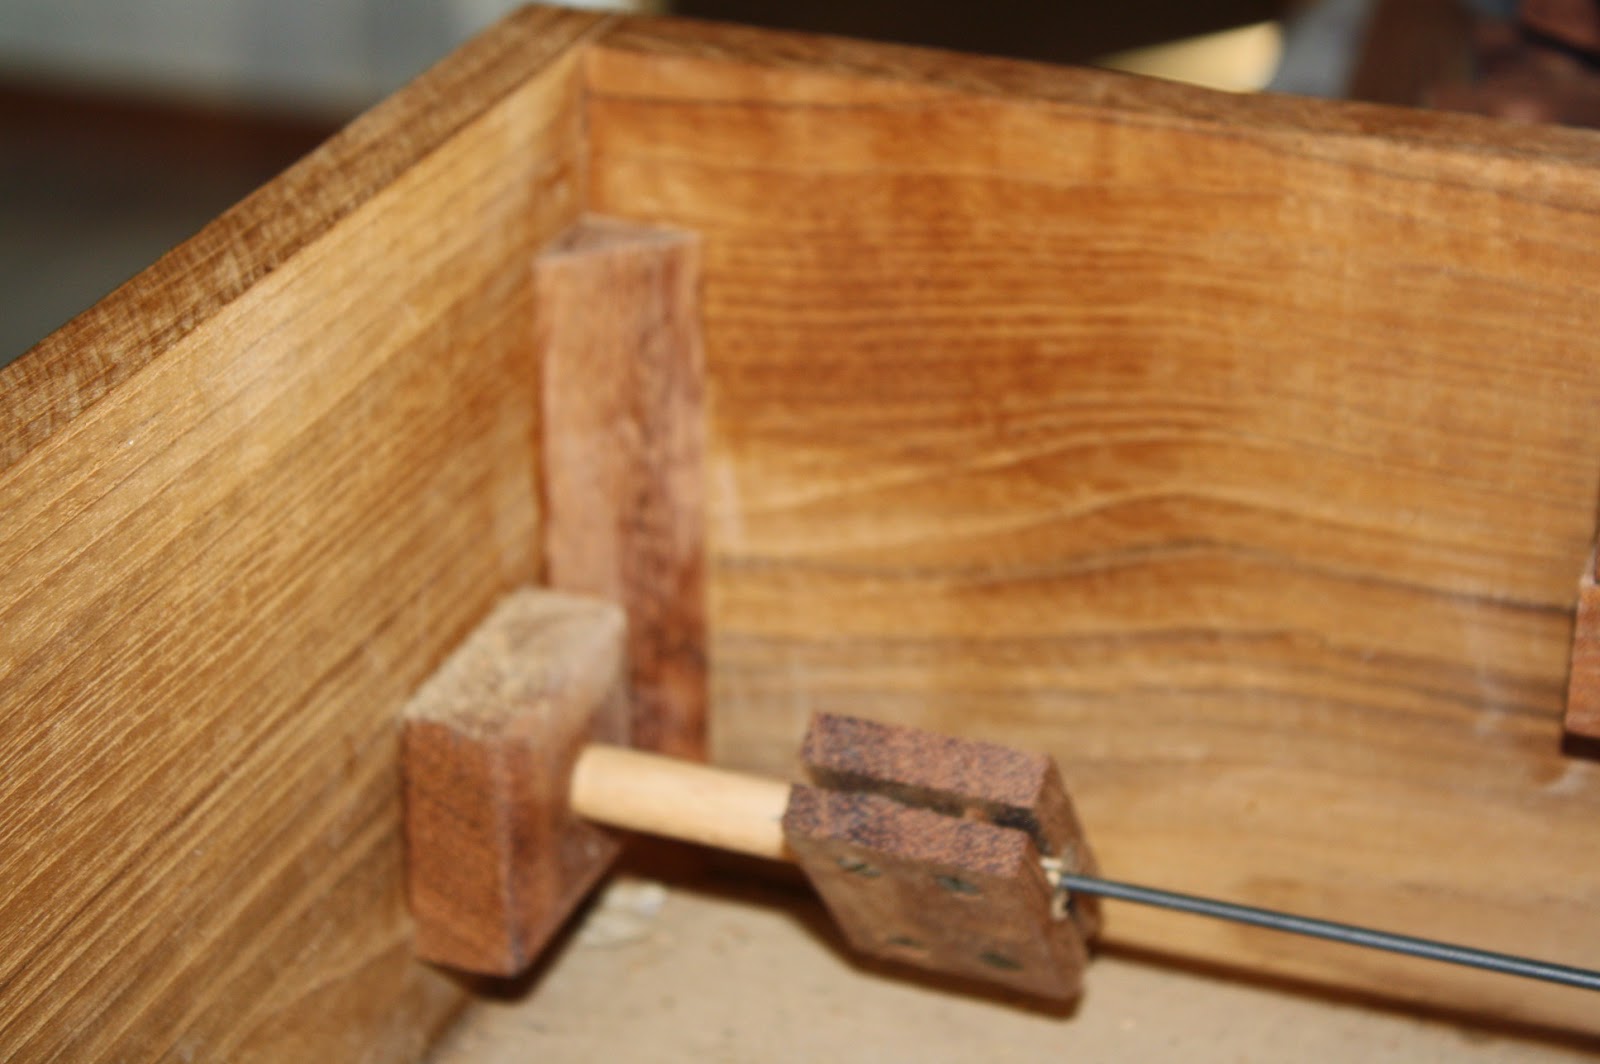
The chest has been damaged by luggage handlers throwing my bag around, but it still holds up. I have re glued it a couple of places earlier, and I can see that it is time for me to do it again.
I guess that I should have glued in some triangular reinforcements in all corners.

These are the tools of the ship that I use for my woodworking:

Hammer.
Multi purpose wood saw (Fuchsschwanz), doubles as a straight edge for marking lines.
Try square.
Clamp.
Hack saw which I normally use as a dovetail saw.
Measuring tape or folding rule.

Once in a while I use a drilling machine, but that is not very often, but those are on board as well.

My own tool set can be seen on one of the pictures below, and consists of:

3 chisels, 1/4", 1/2" & 1"
A small dozuki saw
Mallet.
2 brushes for glue
A jar of white glue
Plane
Smoothing iron for the plane
Scrub iron for the plane
Grooving plane
Marking gauge
Sanding block
Home made router plane with an extra narrow iron.
Oil stone for polishing
Pencil
Linoleum carving chisels (the newest addition to the chest)
Sandpaper grade 80 and 150 (as far as I remember)
Shooting board which is incorporated in the lid of the tool chest

I also bring a bit of hardware, all of it is in the small size:
Brass screws
Brass nails
Finishing nails.
Brass hinges (3 pairs)
An inset lock
Galvanized hinges (1 pair)
Turned drawer pulls (the dark stuff in a bag, they are very small)
A piece of a bone.
Some small pieces of cardboard to use for dovetail gauges.
A bit of emery cloth.

The only thing I have sometimes felt that I was missing is a jointer plane. But that has mostly been an issue if I had to glue up some sort of panels. Jointing two edges is not what a smoothing plane is designed to do.
Apart from that it is a pretty powerful tool kit when combined with the few items I need from the ship.
You can theoretically get by with only one clamp for work holding, but having more is advantageous in case you need to glue up something.

The tool I use the least is the 1" chisel, but I still like to use it for paring and if I make large dovetails.

The tool that makes the biggest difference is the scrub plane, or in my case the scrub iron for the smoothing plane. Being able to quickly process stock makes a huge difference.

Second on the list of tools that make a difference is the grooving plane. Because this enables you to make a wide variety of things: Tongue and groove boards, Grooves and dados, I even used it when I made a raised panel. The great thing with the grooving plane compared to a real plough plane is that at least the Stanley No 248 is so small that it will easily fit in a small tool set like this. I only have 1 iron for it (5/32"), but if I make multiple passes that doesn't pose a problem.

My conclusion is that the set is working pretty good for the type of projects that I do while on the water. But the tool chest itself should probably have been a bit sturdier made in the first place.


Damaged lid.

Lower chest cracked along the groove for the bottom.

Tools of the ship.

The line up of my own tools.

The shooting board.

Hardware assortment.

The tools neatly tucked in the chest.


Monday, December 8, 2014

Gerstner inspired tool chest, fall front hinge mechanism

This post was actually going to be about finishing the bottom drawer, and making some more drawers. But since my drawer stock has gone inter galactic WARP 1+ 2, I had to think of something else instead - The fall front.

As far as I have been able to see on pictures of Gerstner chests, and on their home page, they use some sort of bracket for the fall front mechanism.
Hardware is fine for me, but I didn't feel like making any for this project. Besides there had to be another solution.

Drilling a hole in each side and putting a dowel there was my first idea. The problem with this route is the fact that the dowel needs to be placed very low on the front, so the drill would likely wander off through the side. There was also the problem of how to get the front in place, and then plug in the dowels. There was no way I could tilt the front and still make contact with the dados for the hinge dowels.

Yesterday I had a revelation (OK maybe just a bright moment..), and today I tried it out in real life:
I made a groove in the bottom of the front.
Next I planed a small stick that fitted tight into the groove. I drilled some small pilot holes for the screw itself, and some bigger holes for the heads of the screws, so they could be sunk below the surface. That way I could finish the stick by planing it while it was in the correct position. That ensured a level surface with the front.

I then trimmed the ends of the stick to the correct length i.e. a little shorter than the depth of the dado where it would end up running.

The final step was to round the two protruding ends so they would fit in the dado. I used a chisel for the initial rounding and a piece of sandpaper for the final touch.

I unscrewed the dowel stick, and inserted it in the case of the tool chest. Then I brought up the lid to the stick and screwed it back into the front again.
The great thing about this approach is that:
1) It works.
2) It is cheap.
3) It is repairable

A thing that seems to be unrepairable though is the stock for my drawers. I have reached a conclusion, that I'll take the project with me home, and then I will make some drawers of some stock that is more stable. I could also go the spruce way for drawers, but I don't feel like doing that So I'll probably make the drawers out of some elm at home one day.


The fall front hinge.

The warp of the bottom drawer.

More warp on the next drawer front.

Saturday, December 6, 2014

Gerstner inspired tool chest, drawer with half blind dovetails.

Mario Rodriguez once wrote an excellent article for Popular Woodworking on how to make drawers.
He advocated re sawing the stock for the drawers, and then wait a couple of days before working on them, to make sure that all the stress was gone.
I pretty much tried to follow that advice on these drawers, but these boards were actually more twisted now than when I had just planed them. I guess Mr. Rodriguez has got access to better stock than dumpster wood.  Anyway, I can greatly recommend that article if you want some tricks from a pro on making really nice drawers.

I decided to soldier on despite the less than perfect stock. Otherwise the project would have sort of come to a halt.

Some wise man once said that grooving comes before dovetailing. I am not sure if it was Abraham Lincoln, or Niels Bohr, but regardless of who said it, it is still one of those advices that still hold true.

After cutting the stock to the desired lengths, I found my grooving plane and adjusted it, so I could start making the grooves for the drawer runners.
The wide grooves were made by readjusting the fence until I had reached the planned width of the grooves.
Next I adjusted the depth stop and the fence, and made a groove for the bottom. This groove was ploughed in both the front piece and the two sides.

I used my marking gauge to scratch a line on the ends of the boards so I had something to mark my dovetails from.

This is the first time I have made a drawer with a groove for a runner. I decided to put a pin where this wide groove is. Since it is in the middle, it looked OK to me. I guess the drawer will newer be used for a really heavy load, so two tails were deemed to be enough.

First I cut out the tails, which went smooth, since the only material that needed to be removed by chiselling was the middle part where the bulk was already missing due to the wide groove.

Next I drew the outline of the tails on the front board and sawed to my lines. A little bit of work with a chisel and I could make a test assembly of the first corner.

The dovetails came together at first try, but they are a little gappy. I guess the reason was that I never bothered to true up the corners before making them. They're all right for a project like this, and they'll hold. That is the most important thing.

The assembled corner.

Testing the drawer in the cabinet.


Friday, December 5, 2014

Carving a name sign with a utility knife, part 2

A couple of hours of work was all that required to complete the letters. There are a few tool marks left behind, but after all it is also a hand made sign, so it shouldn't necessarily look like it was moulded in plastic.

The profiles of horses at the ends of the board are my first attempt on carving something that elaborate. One of the challenges compared to letters is the fact that there aren't that many straight lines on a horse.

My first idea was to carve the horse in the same way as the letters, so the shape would be a depression. After looking at the horse I ruled that idea out. The ears and legs are pretty thin, so I think it would have looked strange to carve it that way.

Instead I decided to carve around the horse, so the horse itself will stand proud of the surrounding area.

For this part of the carving I had to stray away from the notion of using inly a utility knife.
This spring at the annual flea market held by the local shop in the village, I was given a small set of carving chisels that looks like they were intended to be used for carving linoleum .
They were far from sharp, and looked pretty cheaply made.
I guess they are from the 70'ies or the 80'ies, based on that they are made in Japan. Newer chisels of that sort would most likely be made in China or India.

I sharpened a pointed scalpel shaped chisel and a small gouge.

I traced the outline of the horse with the scalpel shaped chisel, and removed the material around the horse using the small gouge. This was actually easier that I had imagined, and I think the end result looks OK.

If I was going to paint the sign, I would paint the background red, the depressions should be white. That would give white letters and two red horses on a white background. I think that would look good. But it will be up to my friend if she wants to paint it or not.


The completed name sign.

My Linoleum carving chisels used for carving the horse profiles.

Wednesday, December 3, 2014

Carving a name sign with a hobby knife.

One of my good friends had to have her old horse put down due to old age. I had carved a name sign for that horse, and she asked me if I would make her another one in case she got herself a new horse.
I told her that I would be happy to make her a new sign for her future horse. About half a year ago, she told me that she had bought herself a new horse.

I was excited, and also a bit scared, because some horses have incredible long names, and I would hate having to carve a name like  "Vognmandsgårdens Marli" (An actual name of a pony that we once looked at).
Luckily my friend's new horse didn't have quite such a fancy name. Even though it isn't exactly short either.
Some breeds of horses have their own "symbol", and I have previously carved the symbol of Danish warm-blood horses, which is fairly straight forward: A crown and a wavy line below it.

Since her new horse is a mix of two different breeds, I opted for the logo of one of them: the logo of the PRE (Pura Raza Española) It is a horse seen in profile, and I think I'll be able to make it look OK.

I write the name I am going to carve in a Word document, and for my name previous carving projects I have used the font: Clarendon bold. But since it is not available on this computer, I have found another font that is OK for carving too: Mongolian Baiti size 160.

After printing out a document with the name, I tape it to the board I am going to carve. In this instance the board is made out of the longest step from the salvaged pilot ladder. This wood is rather soft, so it should be fine for my type of carving.
I measure the distance from the top and bottom of the letters to the edges of the board to make sure they are in the middle.

The next step is to take a hobby knife with a new blade. If it is of the break of type, I break of one piece of the blade to have a fresh edge.

Using a light cut, the letters are carved out of the paper. The trick is to use just enough pressure to leave a very fine line in the surface of the wood. Sometimes the letters are very close to each others, on this sign the lower part of the I and the X are almost touching. In that case I just move the line a bit so there will be a small space between the individual letters.
Once that is done, I remove the remains of the paper.

I start by cutting in the middle of the fat line on one of the letters. I try to hold the knife at an angle of approximately 60 degrees sideways.
Once I have obtained a small V shaped ditch, I gradually make it wider and deeper, taking care to maintain the centre of the V shaped ditch in the middle.

To get into the rhythm of carving again, I normally start on some of the easier letters. I.e. all the ones that are not round or curved. In this name the only difficult letter is the S.

I have decided to leave the horse profiles on for a little bit longer while I try to muster the courage to try carving them.

A good source of light will greatly aid the work.


The sign with taped on templates.

Carving out the letters of the templates.

Hard to see, but there are faint lines of the letters.

The approximate side angle  while carving.

The first steps of carving.


Tuesday, December 2, 2014

Gerstner inspired tool chest, a planing stop that will smash your hand.

After yesterday's hard work re sawing the boards, I was looking forward to getting in the shop today because I expected that planing the boards would be a piece of cake.

The first board did indeed live up to those expectations, no tear out and a nice looking surface emerged after a little bit of planing.

The following boards didn't cooperate to the same extent to say the least. One of the re sawn boards had grain that came from all directions and I couldn't make a nice looking surface. Most of them, were OK though, they would change direction on one third of the board which meant that I had to rotate the work a bit to get a decent surface.

The wood was pretty hard to plane, and it was a joy when I finally decided to tackle the spruce for the bottoms of the drawers.
Two of the spruce pieces were a walk in the park, but the other two had so large knots that I couldn't deal with them. I actually expected that, but I had tried to tell myself that it would be OK. I guess I lied.
This means that at some point I need to re saw another piece of a pallet side, to make two more bottoms, but I'll leave that for now.

After making the boards almost the same thickness I ripped them to the correct width. I was just able to make fronts and sides of the wood I had prepared. Once I start plowing grooves for the bottoms, I can determine what the size of the back should be.
Some of the boars I made today were only planed on one side. Partly because I didn't want to spend more time than necessary, and partly because the plan is to line all the drawers with some green felt once they are all done. I feel like it would be a wast of my energy to try to produce a perfect surface for something that will be hidden away.

My biggest problem concerning planing is that I smash my hand into the wall quite often. This is not because I get angry or trips or anything like that.
No, the problem is that my planing stop is a small piece of wood that rests against the wall in the workshop. The workbench is pretty small, so there is a limit to how long I can make the planing stop. If it is too long, I can't stand behind the plane which isn't good either. The best compromise is a board of approximately 8" length, This means that at the end of my planing stroke, when the blade leaves the board I have 4" left to stop my hand before hitting the wall.
It is especially hard when I am using the scrub plane and need to put some weight behind the plane.
I have tried to pack a bunch of shavings against the wall to act as a cushion for my hand, but sometimes the shavings fall down, and I am back where it hurts.
This all make me long for my workbench at home..


The position of the plane when the blade stops cutting.


The graduated height of the drawer stock.

Monday, December 1, 2014

Gerstner inspired tool chest, re sawing and the fall front

I have been busy re sawing stock the last couple of days, so I could have some appropriate boards for the drawers of the tool chest.
My original plan was to use some oak for the drawer fronts, and spruce for the sides,

In the meantime a golden opportunity presented itself.
One of the ships pilot ladders (a rope ladder) had broken one of the long steps, and was subsequently thrown out. These ladder steps are made out of some nice straight grained exotic wood, so I decided to see if I could reclaim them. Therefore I went dumpster diving in the common garbage dumpster that is on the ship, and below some heavy mooring lines and some old metal pails I got hold of the pilot ladder.
There were 4 narrow steps and one long step. The long step was the one that had been damaged.

So now the plan has changed from oak front / spruce sides to exotic front + sides and spruce bottoms.

I first re sawed the long step which was really easy. The smell of the wood is kind of like cheap plywood, and it is rather soft. It reminds me of the same type of wood that was used for making cigar boxes of (I have no idea what the species is). This long board will not be used for the tool chest, but for another project that will be revealed when we head back to sea.

The next task I carried out was to re saw some of the pallet sides to make material for the bottoms of the drawers. Re sawing something that is 7.5" wide is not a walk in the park when you have a cheap all round saw, but I managed to produce some thin boards that I can use after I have dressed them with a plane.

The short steps of the ladder were heavier than the long step, and they are definitely made out of some other species of wood. It doesn't smell like teak, but it seems like there is a lot of natural oil in the wood. Re sawing those boards were a lot harder than what I have tried before.
Each board measured 4.5" x  16" and it took me half an hour to re saw each one of them.

The good thing about all this hard work is that I get some exercise and I really appreciate my band saw and table saw at home.

The fall front of the chest was made last time I was on the ship, so I haven't done that one in between the re sawing.
It is made using tongue and groove construction for the rails and stiles, and the panel is inserted in a groove. I haven't attached the pins for sliding yet, nor have I made a mortise for the lock. I wan't to make the drawers first and then I can move back to the lid. Anyway, my idea for installing the lid requires it to be done pretty much when the chest has received some kind of finish, so I am not in a hurry.
Re sawing set up. This wood is hard!

The fruits of hard labour.

The front lid.

The front lid inserted in the chest.

The prize from dumpster diving.

Thursday, November 27, 2014

Gerstner inspired tool chest

Last time I was on the ship I started a Gerstner inspired tool chest. I never made any blog entries about it due to our Internet connection which was incredibly bad to say the least.

The idea was to make a pallet wood build of something that would feature a Gerstner like front. I managed to restrain myself from planning too many drawers, so it is just a rather small chest with 4 drawers. Nothing too fancy.

I used some stack-able pallet sides for material. It is spruce and has a nice width to it. It also isn't too thick, so I could dress the thickness just using my scrub plane. It is a huge advantage not having to re-saw wide stock.

The frame is assembled with through dovetails in the corners, and the back is inserted in a groove.

I made the front dovetails mitered because I think it looks better that way on a piece like this. Already now I think the sides look a little clumsy, so I should probably have made the stock thinner.

The drawers will be graduated in height, and they are intended to slide on oak runners. I had made some oak ready for the runners, and tonight I planed them so they would fit in the grooves. Each runner is 10 mm high and approximately 11 mm wide (I didn't measure them). I still need to make 2 before being finished with them.
My idea is to simply nail them in place, to avoid any wood movement issues. They fit snugly in their grooves, so the nails wont take any load from the drawers.

I have actually made the front as well, but it seems that I have forgotten to take any pictures of it. The front was a bit of an experiment. Previously I have used mitered bridle joints for the frame, and then added a floating panel inside. I decided that this front would never see the same amount of beating that a lid on a normal tool chest, so a bit more delicate construction would be OK.
Consequently I made the front as a purely tongue and groove construction but still with a floating panel inside. I'll try to take some pictures tomorrow.

I still have a little bit of oak out here, so I'll see if I can mange to make the drawer fronts out of it as well. Regardless of what type of finish I will use, it should give a nice contrast to the ligher coloured spruce.


Layout lined for drawer runners. groove for the front is done.

Sides complete with all the grooves.

Dovetailing setup.

The finished case. 


Wednesday, October 29, 2014

The painted door in the stable.

Today it wasn't raining, so I decided to move swiftly and paint the door.

I normally like to use oil base paint, since I haven't got much faith in latex /acrylic paints.
The colour is called Swedish red. It is a Danish produced paint from Esbjerg Paints. The label of this paint is called Arsinol, it is intended for outdoor use.

The paint has got some added thickener (I think it is called thixotropic), so it doesn't drip very much. It covers really well, so all in all I find it an OK paint.

The handle is placed high up on the door, but since the holding arrangement for the latch is also embedded in the brick work, I had to stay with that position.

The outside.

The inside.


Tuesday, October 28, 2014

A door for the stable

Before leaving to sea last time, I started making a new door for the North side of the stable.
But I never got around to make an entry about it.
Now I am back ashore again, and I have worked on finishing the project.

Before starting the project I read up on the door making theory in "window and door making " from Lost Art Press. The descriptions were pretty close to what I figured, but the book caters a little bit more for front doors than stable doors.
I also checked "Das Zimmermannsbuch", and there were some gems too.

The door leads from the stable to the paddock, and it is very rarely seen from the outside by anyone except for the horses. And I actually doubt that they are much interested what the door looks like, as long as it is opened to let them in in the afternoon.

Ideally a door of this type is made out of tongue and groove boards, but I didn't want to buy any, so I decided that shiplapped boards would be sufficient. These I am able to make myself on the shaper.

The frame was drawbored together, and the first layer of boards were nailed to the Z shape. TO make room for a little wood movement, I placed a small piece of sheet metal between each board as I nailed them on. After nailing I removed the sheet metal again. This gives room for the boards to move a bit with each season.

The door is mounted directly onto one side of the wall, so there is no frame that it should fit into. This also means that the door won't close fully unless the wall is completely level and flat (which it isn't).
I wanted to use the old hinges, so I had to stick to the basic design of the old door. I think it is the original door, and it has held up OK since 1918, so the design can't be that bad.

After marking the outline of the door opening to the first layer of boards, I sawed out the curve and marked where I wanted my next layer to be.
A board was placed on the centre of the door, and the top layer boards were given a small moulding on the shaper. These boards are also shiplapped by the way.

I nailed on the second layer so the outside of the boards were flush with the line I had marked. Most of them were flush to the centre board as well, but a few of them had a little gap there.
My idea is that it is a lot easier to cover the centre with a moulded board, and thereby cover up any irregularities than it would be to make the centre perfect, and having to make a nice looking outside by sawing and planing etc.

After fitting all the boards, I chamfered the edges of the frame assembly. My crappy router managed to shift the bit while I was chamfering, so I had to plane all of them with a block plane to make them look almost the same.

I installed the door and finished by chiselling 2014 in Roman numerals.
Tomorrow I hope to paint it. It will be red on the outside, but I haven't really decided if it should be painted on the inside or if I should leave it natural. I am considering painting it white because it will help lighten up the stable.
First side of the front is nailed on.

The front of the door showing the small gaps next to the centre board.

The old door.

The old door form the outside.

Sideburns and Roman numerals never go out of style.


Saturday, October 11, 2014

Das Zimmermannsbuch.

I purchased this book from Dictum about 2 years ago upon a recommendation from Peter Lanz.
The book is written in German which makes it a bit harder (for me at least) to read compared to an English text.
The illustrations of the book are spectacular, and there is a wealth of information regarding how buildings were made around the turn of the 19th century.
It is not you typical timberframing book, since the architecture which is covered is more Jugend or Art Noveau style than most other books I have seen.
Sadly a lot of the information in the book is obsolete, based not on how things are supposed to be done, but based more on how we choose not to decorate most buildings of today. There are several suggestions and instructions for towers to be placed on roofs for decoration purposes. I don't think a house with that kind of decoration have been built in Denmark for the last 75 years.

The book covers projects from both ends of the scale, e.g. construction of a small stand for a market and in the "slightly" larger end an example of a circus building made out of wood.

There are a lot of tables in the book concerning e.g. dimensioning of rafters and joists.

Every time I have read in the book, I am kind of saddened by the loss of decorative elements on most architecture today. But I am afraid the costs would be very high if something similar was to be made today.

The book is not one that is read cover to cover, but more used like a handbook or for inspiration. It can also be read as a document of an architectural period which is still visible in many old towns in central Europe.
I would recommend it just for the fantastic illustrations alone, but I have used it as a handbook as well during a project of constructing some stairs.


Dies ist meine erste Versuch um ein Bisschen Deutsch zu schreiben, Wenn es nicht ganz korrekt Hochdeutsch ist, dann möchte ich gern entschuldigen, aber meine letzte Lektion in Deutsch in die Schule war 1989.

Ich habe dieser Buch vor Zwei Jahren von Dictum gekauft. Es wurde mir empfohlen bei Peter Lanz

Die Abbildungen in der Buch sind ganz spektakulär und es gibt eine riese Menge von Information über wie Gebäude konstruiert war rund Jahr 1900.
Es ist nicht eine typische moderner Buch über Holzkonstruktionen weil das beschriebene Architektur mehr Jugend Stil ist, im Vergleichung mit andere Bücher die ich gelesen habe.

Leider ist ein große Teil von die Information in das Buch überflüssig, basiert auf wie man Heute wählt Gebäude nicht zu dekorieren. Es gibt mehrere Vorschlage und Instruktionen über wie man zum Beispiel Dachreiter und Türme gemacht und installiert.
Ich zweifeln darauf das es solche dekorative Elementen in die letzte 75  Jahre in Dänemark gebaut ist.

Das Buch umhandelt Projekte von der ganze Scala. Von Sodawasserhäuschen bis Zirkusgebäude, alles aus Holz gemacht.

Jede mal ich diese Buch gelesen habe wird ich ein Bisschen traurig wegen der Mangel auf dekorative Elementen auf Gebäude heute. Aber ich glaube das die Kosten für solch ähnliches Arbeiten heute wurde sehr hoch.

Dieses Buch ist nicht ein die man von Anfang bis Schluss lest, sondern mehr als ein Handbuch für Inspiration benützen.
Es kann auch wie ein Dokument über ein Architektonisches Periode, heute noch in viele Städte in Central Europa deutlich sichtbar gelesen werden.

Ich möchte das Buch allein auf Basis die phantastische Illustrationen empfehlen, aber ich habe es auch als Handbuch benützt, bei Konstruktion einen Treppe.

Thursday, October 2, 2014

Stanley Bedrock 604, part 3

After the glue had dried I sawed of the majority of the excess of the small piece of oak.
I then used a file for further shaping of the damaged piece of the handle. When I was satisfied with the rough shape, I found some sand paper and spent a long time sanding the tote. I didn't want it to be possible to feel any transition between the two species of wood.
I ended up sanding to grit 280 which is the finest grit of emery cloth we have out here.
The contrast between the oak and the rosewood looks OK to me. It is an honest repair job that I haven't done anything to hide.

For some strange reason we have some varnish on board that is actual wood varnish. Sadly the lid doesn't fit very well, so most of the thinner has evaporated. The consistence is a bit like maple syrup.
I decided hat it was probably still better than electrical insulation varnish, so I added some to the knob and the tote using a small piece of soft foam that I took from a spare piece that once protected some electronic prints.
The varnish being so thick resulted in a very fast drying time and subsequent less than ideal flowing of the surface.
3 coats looks nice, and I don't mind that I can see the "brush" lines from my small piece of foam.
There are a few nibs on the front knob, but I guess they'll wear off when I start using the plane.
Otherwise I'll rub it a little using a scotch brite pad or some steel wool.

I made a new screw for the front knob using the old stud. I didn't have any taps and dies so I could make one from scratch, so I just turned a new brass head on the lathe and silver soldered it to the stud. Later when it had cooled down I sawed a slot using a hack saw.

The rear tote moved slightly even after I had tightened it. I remembered seeing a trick by Paul Sellers, where he is adding a small patch of anti skid mat (probably not the correct name) between the bottom and the tote.
Anti skid mat is something that we have plenty of out here. In Danish it is called "slingredug" meaning a tablecloth for when there is rolling and pitching.
Anyway, I cut out a small piece and put it under the rear tote - That really made a huge difference! The rear tote feels rock solid and since our anti skid mat is blue, it doesn't show too much.

Finally I sharpened the blade using some emery cloth instead of coarse grit stones, and finished of using my old fine grained oil stone (I have no idea of the grit of that one).

I made a few test swipes on a piece of spruce, and it works just fine. I am already longing to try it out at home on a decent workbench.

Conclusion to the rehab:
The most work was on the broken rear tote, but taking my time I managed to glue the parts together and to make a nice fitting patch.
Apart from that it was mainly cleaning of the parts.
It is a job that can be done at sea without too much trouble. Most planes aren't too big to fit in a suitcase. The size and weight might be an issue if you move beyond No 5's
A set of taps and dies for the threads on the plane would have helped, I might have to purchase a set if I set out to fix another plane sometime.
The plane could have been polished a little more, but I kind of like to be able to see that it is approximately 100 years old.

Stanley Bedrock 604, type 6.

Repaired rear tote.


Sunday, September 28, 2014

Stanley Bedrock 604, part 2

The majority of people who commented on my choice of wood for the patch cast their vote in favour of oak.
As some of you might remember from my "Seaborne chest build" I cave in pretty easy when it comes to peer pressure (as long as it is sensible of course). So I am doing the same thing here and going the oak way.

My plan was to use a file to make the damaged area resemble an indent with a square profile with two sides. This would make it easy to make a piece of wood that could be glued really tight into the spot and later be trimmed to the outer shape.

I also considered using a half round file for making a semicircular indent, but I think the square route is safer. 

Normally I would try to make a repair job blend in as much as possible, but for this particular job I have decided that it can stand out a bit colour wise.

Filing the area away took maybe 5 minutes, and I just filed the small block of oak so it fit on the two sides.
Before adding glue I made a test fit and a test of the clamp. Few things are as frustrating when it comes to woodworking, as when you are not able to make a clamp up because the clamp will slip or otherwise don't fit.

Glue was added to both parts and the clamp was attached.

Tomorrow it should be dry so I can start reshaping the upper part of the rear tote.
The filed away area.

Testing the fit of the block of oak.

Ready for applying glue.

The glue up.

Saturday, September 27, 2014

Stanley Bedrock 604

For my birthday this year, my dad gave me an old Stanley Bedrock No 604 that he had picked up at a thrift shop for about 10$.
It is highly unusual to find a Bedrock in Denmark, so I was very pleased with the news of him finding it, and actually I asked myself if he had any birthday gifts for me, because if not I would like the plane.
He and my mother did have somehing else for me too, but he was glad to give the plane to me, so I could fix it up.

The rear tote was broken, and the nut for the front knob is needs to be replaced, apart from that it is in OK condition given the age of it.

I brought it with me to the ship this time, because a plane restoration is a nice little job to do while at sea.

I started out by dating the plane by means of the Internet. I merely googled "Stanley Bedrock plane dating" and some suggestions came up that could provide the answer.
As far as I was able to conclude, it is a type 6 which was manufactured between 1912 - 1921.

My fingers itched so much for starting to fix the plane up, that I forgot to take some "before" pictures.
But what I did was to wash the parts in some soap water and then I cleaned them with "Metalbrite" which is a phosphorous acid based rust removing chemical often used onboard ships.
The japanning is not perfect, but it doesn't have to be, the plane is old so it shouldn't necessarily look brand new.

After cleaning the parts I have lapped the bottom of the frog to the bed using some valve lapping paste. It didn't need much work before I was satisfied. The bottom and the sides of the bed was cleaned up using some sandpaper on a flat surface, these too didn't need much work.

The rear tote which was broken had been glued before. I decided to flatten the broken parts completely and try to glue it up again. So far it looks good.
On the upper part of the tote, a chip has come off. I haven't got any rosewood out here to use for patching, but I think I have a piece of oak lying somewhere that can be used for making a small repair.
I have considered using spruce for the patch instead, because that way it will clearly stand out that the handle was repaired.
What do you suggest? Oak (if I can find it) or spruce for the repair job?

The glued up rear tote.

Oak or spruce / pine for the patch?


Friday, September 19, 2014

Modular marble machine

Four years ago I purchased the plans for a modular marble machine from woodgears.ca
I started building the machine, but I have been held up by various other projects along the way.
During the initial cleaning of the workshop before the Welsh stick chair extravaganza, I had to move the semi built machine. I decided that I should finish it before starting too many new projects, so we could have fun while the children still have an age where it is funny.

Originally my plan was to make it completely out of exotic wood, but in the end I used a few pieces of elm as well, since I had some left after the chair building extravaganza.

There are an incredible amount of small parts that need to be made, and precision is important to enable the units to fit together as intended.
It is not a hand tool only build, because of all the boring of holes at exact depths. Off course it will be possible to do it only by hand tools, but I opted for a router in a small router table for making the grooves in the runners.

What really caught my eye the first time I saw a video of the machine was the ingenuity of the marble pump. At the woodgears.ca homepage, there is a video showing how to build it. It is cool because it has very little practical use - and the idea of pumping marbles is close to defying reality.

The plans for the build are very thorough, and it comes with additional help information, so even though it looks like a daunting project, it can be made with just a little bit of determination. The hardest thing is to keep the project going, since there are so many small things that need to be made.
It does look overwhelming for a start, but just go ahead one page at the time, and you'll get to the end of it.

My only small complaint with the plans is that some of the measurements are a bit optimistic for woodworking. Most of these measurements are probably derived from calculations used by the program for making the plans, but 1.33 cm is hard to get dead straight on. But I guess that if you use your own sound judgement, you can easily overcome this.

The completed machine is a marvel to behold, and it serves absolutely no practical purpose.
-But it is fun to play with, addictive to watch, makes some nice plop plop sounds when the marbles are rolling and gather a lot of attention from people who sees it.
This weekend Asger (8) is having a friend coming over for playing, and I expect that they'll spend a lot of time playing and having fun with the machine, and that is actually good enough of a practical purpose for me.

Asger operating the marble machine.

Checking if the marbles are exiting correctly.

Another set up of the machine.

View from the crank side.

The inside corner. Instead of a spline, I opted for a triangular block that was cut to the correct height and glued in place.


An action video of the machine in function, please bear with the "jumping" focus. Asger is the camera man on this film :-)