Wednesday, October 30, 2013

Seaborne chest part 3, work holding

Today I finished the remaining 3 corners of the upper part of the chest. I noticed that my last dovetails were better than the first set from yesterday, but that is usual. After all I don't make dovetails every day, so the first set is kind of like a brush up practice.

I have developed some work holding methods that are working well on a ship. They would also work well in a garage with a work table and a mechanics vice. Basically I get by using the vice and 3 pieces of wood and 1 clamp.

I try to never clamp the wood for the project directly in the mechanics vice, as the jaws easily mar the surface.

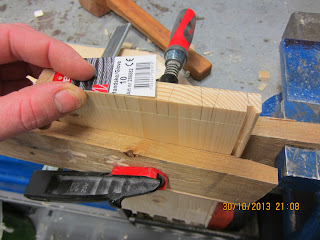
For dovetailing lay out and sawing. A piece of wood is held in the mechanics vice, and the piece to be dovetailed is held on to the fixed piece by means of a clamp and an extra small piece of wood to protect the surface from the clamp.

For chopping out the waste between the pins or tails. The piece to be worked on is positioned on top of a wide board. A small piece of wood is placed a bit away from the end, and a longer piece of wood is placed on top of the small piece and on top of the piece to be held. A clamp is used to press the longer piece of wood down. The same principle as in a leg vice, just horizontal.

When I need a planing stop, I use the wide board as a base, and position the small piece with one end on the wide board, and the other end on the work table. Then I just clamp it down and it holds the wide board and acts as a planing stop at the same time.

When I plane the grooves, I turned the long piece of wood so it was with the broad side up in the vice, and clamped the pieces to be planed on top. Again I used the small piece and a clamp.

I will be the first to admit that working on a proper workbench is easier. But lack of a good workbench shouldn't necessarily keep anyone from doing a little bit of woodwork.


Dovetailing setup


Chopping setup

My dovetail marker.


Tuesday, October 29, 2013

Seaborne chest part 2

Yesterday I smoothed the boards using the smoothing iron for the plane. It was easy and satisfying. When I was done, I crosscut the pieces to length and then I used my lid based shooting board to clean up the ends. I am not used to working with a shooting board, so the first end I managed to tilt the plane and messing up the end a little. Once I noticed it, I corrected the fault.So basically it was a success with the shooting board.
I guess that a metal plane might be a little easier for this job since there is not much weight in a wooden smoother. But you can't have light weight for travelling and heavy weight for shooting.

After the shooting, I sharpened the blade of the grooving plane. I only have one blade for it which is 5/32. For the thickness of my stock, a groove of 1/4" would probably have been a little more appropriate, but Instead of making two parallel grooves adding up to the desired width, I decided that 5/32" isn't going to hurt anybody. I could probably make a new blade for the plane some time, but I don't feel for it right now.

I ran some tests on the grooving plane as well, and adjusted it to the grooves I have decided on for attaching the skirt of the chest.

Today I planed / plowed the grooves on the boards. I have made the grooves a tiny bit further in on the board than the actual width of the groove. That way, I can always adjust the fit by planing a little of both pieces. I tested the interlocking grooves, and they were a bit tight, so maybe I will need to resort to planing them once I am attaching the skirt.

When I cut dovetails, I normally like the tails first approach, but on a ship without decent work holding, it is easier to do it pins first. The pieces are so small, that that it is not difficult to balance them on an end for marking the tails. So that is how I do it out here.
I made one set of dovetails, and they were OK.

I haven't found a miter gauge, so instead I used a small stiff piece of cardboard as a dovetail marker. I cut of one side in a ratio 1:6 which is pretty standard for soft wood.

Tomorrow I plan on continuing with the dovetails.


The shooting board lid of the tool chest.


Sunday, October 27, 2013

Seaborne chest part 1

The tool chest for the sea made it on board in one piece, and today I had the opportunity to start a new project.

On the Siem Marlin I was spoiled by having plenty of exotic pallet wood. I even have a perfect 12” wide board of idigbo waiting for me if I ever get back to that ship, provided off course, that no one have used it in the meantime. The wood we have here is by no means furniture grade stuff. All I have managed to find is 1.5” x 6” pine used for construction purposes. I had hoped for some pallets or pallet sides, but we don’t have any. So as usual I’ll try to get by using what is available.

I decided to build a small chest based on the Roy Underhill joiner tool chest, because I have always liked that chest. Furthermore I think it will look OK even with a coat of paint on it. That might be necessary since I am afraid there will be some missing knots etc. which will be hard to conceal.
The major dimensions of the chest will be roughly 8” x 12” x 16”.  I don’t want to build anything that will be too large due to the challenge of getting it home once it is finished.

Stock preparation began by crosscutting the lumber to length. We have got a cheap standard 22” saw with combination toothing on board. I used it for ripping the pieces to half the thickness, which was quite a big job. The pieces actually looked better than I had hoped for straight from the sawing.

I managed to rig up some work holding using a piece of the construction lumber as base and a small piece of wood as a planning stop. The planning stop was clamped to the workbench and it worked great. The best thing though was that I was able to use my scrub plane for dressing the stock. It was so easy I could hardly believe it. 
Nice curly shavings.

Friday, October 25, 2013

Building model houses with the children.

In the autumn holiday we spent a couple of days in our summerhouse. There is no TV signal there, and normally we try to make some things that we wouldn't take the time to do at home. e.g make models using my old Mecano / Constructor set.
This year I had decided to try a new project: Model houses.

Before driving to the summerhouse, I made a large amount of model timber and model planks for the project.
Timber: 1/2" x 1/2"
Planks: 1"x 1/8"
Planks: 1/2" x 1/8"
All approximately 2 feet long.

For bases I had brought some pieces of plywood and a piece of a table top. Furthermore I brought some triangular pieces made from a 1" thick stock, about 2" wide. These became the steps of a staircase.

The only tools used for the build was a hot glue gun and a moulding / miter scissor.

Asger decided to build a barn and Gustav decided to build a house. I showed them a few ideas regarding how the things could go together so it would look like a real scale model of a building.
The scissors do require a little hand strength, so I got the laborious task of being the lumber yard. They would then say what type of timber or plank they would need, and the size of it, and I would provide it from the stock that we brought.

The structure went together fast using the hot glue gun, and the build could continue without having to wait for glue to dry. When a thing didn't look right to them, it was still possible to cut of the piece again using a pocket knife and thus rectifying the fault.

The first day we ran out of glue sticks (we had only brought 5 or 6). The next day we got hold of some more glue and an extra glue gun. That really put a pressure on the lumber yard.

We talked about using the houses for Christmas decorations, so we left one side of them open to view the inner structure, and to be able to furnish the buildings with Santa's helpers.

What did I learn of this project:
Building model houses with children is really fun, they get the idea quickly and there is a lot of progress so they don't get bored.
We used far more wide planks than I had imagined, laying floor and roof really required some wood.
A lot of glue is used in such a project.

What did the children learn of this project:
Stiffeners really do work.
Even if a building isn't perfectly square it still looks nice.
The more accurate your work, the easier it is later on (e.g. when you get to the roof).

Asger with the first frame for his barn.

Mounting the first set of rafters on the barn.

Gustavs house with the floor of the first floor finished.

The barn with the hay loft and some bales of hay.


Laura working on the staircase for the house.

The steps are simply glued to a strip.

Tuesday, October 22, 2013

Roubo red dye experiment (horse based), conclusion.

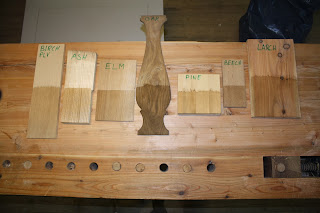
I prepared some sample boards to test the dye on different types of wood. I am not sure that all would have been used as furniture wood back in Roubo's days, but these were the types I could find.
From left to right on both pictures, the species are:
Birch plywood, Ash, Elm, Oak (old), Pine, Beech, Larch.
The oak was something I acquired some years ago, I think it is from the 1950'ies, it was intended to be for the back of a chair, hence the hourglass shape.


To complicate things a bit, I tried tested the dye twice.

First test:
This was carried out a little more than a week ago, and the smell of the dye was unpleasant, kind of like the smell when you empty a dry closet for a caravan or an old highway type public rest room. The smell stayed in the workshop for a couple of days, and then it fainted.

The wood didn't take much color once the dye had dried. The Ash looked like it had responded best to the treatment.
Regarding the color, I wouldn't call it red, but it does darken the wood a little bit, but I think the same effect could be had with tea or coffee. But I suspect that horse dung and urine was easier obtainable in those days tan tea and coffee (perhaps the good ole days weren't that good after all?)

First treatment.


Second test:
I was a bit disappointed that the first test didn't produce some blood red or similar colors, so I decided to give it another go. This time I re-poured the liquid from the lower bucket over the rotting dung, to see if perhaps it was too thin a mixture. The first batch was flushed through using the urine sample described in the last post on this subject.
After seeping through, the liquid looked a little darker.
When I poured it into my small jar, I noticed that the smell wasn't nearly as bad as before.
During brushing on, It didn't smell like what it was made of, but more kind of like.. a horse. Not altogether unpleasant, but not something you would want for a cologne.
While the pieces were drying I sniffed again, and there was hardly any smell left.
Therefore I think this is more like what Roubo had in mind.

I applied the stain to the same pieces, and this second treatment produced some darker results, It is not jatoba or mahogany, but clearly a darker type of wood now (or so it seems).
For some reason the elm seems to respond better on one side of the board than on the other, probably the density of the wood is the cause of it. But the rest of the pieces looked OK, I would even call it a moderate success.
To make sure that the darker tone still wouldn't come from one treatment, I applied some dye to another piece of pine, but the color looked like the color in the first test.

Second treatment.

Conclusion:
The red color is not Salem red, but the dye does darken the wood some. I found it necessary to apply the dye twice to get a satisfying result. 
If the dye is re-poured, it does not smell bad nor does it leave a smell behind. If you use the dye too soon, it is not nice..
If you happen to have some horses on hand, it is a cheap and easy way to make a dye.
If you haven't got some horses on hand, it is a lot cheaper to buy the dye you need.

Monday, October 21, 2013

Tool chest for the sea part 4

I decided to keep the lid arrangement very simple, so instead of adding stiffeners that would allow a set of hinges, I made a rather inelegant (ugly) solution by using a piece of elastic cord together with a piece of suede strap. I had to remind myself that the goal wasn't to make a beautiful chest, but to make something to carry and protect some tools to be used on a ship.
Due to the interior dust seal, the chest is remarkably sturdy despite its thin sides and lightweight construction.

The shooting board on the lid turned out pretty well. It is not massive but consists merely of a few strips placed an equal distance apart.

Since I don't plan on building any large pieces of furniture, the size is OK.

I haven't had the time to make a nice tool roll for the chisels and the plane irons, but again the idea was to get some tools to the sea, I can always make the tool roll later.

Regarding the dilemma of whether to bring a rabbet plane or a plow plane, I settled for a grooving plane which fitted just perfect in the chest. It is a Stanley No 248 that Brian Eve gave to me. I haven't tried it, but I am sure it will be perfect for the sea chest.

I will have to find some wood on board for making a project. A pallet wood build is always a nice start.

The tool list has ended as follows:
Mallet
Plane
Scrub iron
Smoothing iron
3 chisels
Grooving plane
Pencil
Small brush for glue.
A small jar of glue (not in the picture)
Sanding cork
Sandpaper
Dozuki saw
Marking gauge
Oil stone for honing
Shooting board

Hardware stock:
Small brass screws
Small headless brads
Small brass nails
Brass hinges (small)

The low tech closing mechanism.

Tools neatly stored in the chest.

The shooting board and one of the Roubo dye test pieces.

Thursday, October 10, 2013

A tool chest for the sea part 3

As a reward to myself for working on the indoor trimming of our Velux windows I spent about an hour in the work shop last night working on the tool chest.
The windows were replaced during the roofing project, and I haven't had the time to finish the inside until now. It was more fun doing it last time, because I had everything stripped down, now it is a repair job that requires a lot of fiddling to look nice.

The sides of the chest are a mere 8 mm thick to keep the weight down. I discovered that such a thin board requires very delicate hinges. Normally I would like some fairly stout ones for a tool chest, but that wont be an option with this design.

To stiffen things up, and to keep dust out, I installed an interior dust seal.
The dust seal is made out of thin strips (4 mm) that are slightly beveled on one side (about 5 degrees). These strips are glued onto the lower part of the chest and help holding the lid in place, so the delicate hinges wont be damaged.

The good thing about an interior dust seal is that it will even seal the back of the chest, where the hinges are. I made the lid by sawing of the upper portion of the assembly after it was dry. That way there is a nice fit of the lid.

While the dust seal dried, I started making the shooting board that will go on the lid of the chest. This was a great suggestion by Doug Stowe in a comment for my last blog entry on the subject.

Gustav is turning some spindles for his secret project, he really likes using the lathe and he can feel that his skills are developing.

Attaching the interior dust seal.

Gustav turning a spindle.

Monday, October 7, 2013

The horse dung (and urine) experiment, part 2.

The mare with the fitting French name: "La Loire" obviously got fed up with me always lurking around with a small bucket handy, so she decided to cooperate in the hope of ending this seemingly ongoing experiment.

Without any harm I managed to acquire a full load of horse pee, approximately 1 L (1/4 gallon).

My wife witnessed the "happy moment" so the World shall know that there has been no cheating in this experiment.

In front of a camera I poured the liquid over the dung, and behold.. A reddish liquid soon after emerged in the lower bucket.

Now I'll let it wait for a couple of days more to extract any more liquid,  before testing the stain out on some sample boards.

At a point, I thought that Roubo might have had to use buckets made out of iron, so that the stain was merely rusty water, so that will still be my excuse if it does not work very well on the sample boards. Theoretically Roubo could also have used ceramics or other types of pottery, but I guess that an iron bucket was the common at that time.

Success is just around the corner.

Concentration.

This will probably never be a popular recipe for a stain.

The level of stain is rising in the lower bucket.


Sunday, October 6, 2013

A little progress on various projects.

Roubo red stain:
The ecologically sustainable stain is not developing very fast. As a matter of fact it is incredibly slow. I think there is about half a tea spoon of liquid in the lower bucket, so I wont even bother to take a picture of it yet. I have managed to collect some urine from the horses that I have poured over the dung, but it hasn't seeped through yet.
The horses have started to look a bit puzzled though, since I always have a small bucket ready when I am near them. They haven't exactly been super cooperative, but we are slowly getting a bit closer to the goal..

Tool chest for the sea:
I have just finished the shell for the tool box, it is drying as I write. The plan is to separate the upper and the lower part of the case once the glue has dried. I'll see if I remember to take some pictures of it once I get to it.
I did plan to take pictures today, but then suddenly the oil fired boiler for the central heating of our house stopped working, This meant no warm water.. SWMBO generally like it when there is warm water in the tap, so I had to shift the priorities a little. Funny enough, the tool chest didn't come out on top.
I managed to get the thing going again, and I have ordered some spares so I can repair the thing once the parts arrive.
The thrill of typing your credit card details on a web shop is slightly more modest when the 400$ is being spent on a new circulation pump, a safety valve and an automatic air bleeding valve, compared to the thrill I would have felt by ordering e.g. a nice set of chisels.

Yesterday Gustav and I went looking at a new stain manufacturer, and we found one that Gustav really liked, so I'll probably pick it up on Tuesday provided the vet says everything is OK.
Conveniently Gustav preferred the pony with the shortest name which make making a name sign an easy job.
So the name sign is: "Bas".
Another pony we looked at was named: "Drumbad Rathmore Prince", A name sign for that pony would have been quite a task..

Thursday, October 3, 2013

Raising the children's workbench

While I am waiting for the stain to start dripping into the lower bucket, there are lots of other projects that need my attention.

I am trying to finish the interior frames around the Velux windows that were changed when we got the new roof on. Regrettably the local lumberyard forgot to place the order for some pine table tops that I was going to use as window sill, so this project is on idle until they arrive.

Last time the Gustav and Asger worked at their workbench, it dawned on me, that they had grown quite a lot since I installed their bench 7 or 8 years ago.
When I installed it, I made a custom base for it, so it could fit the then 4 years old Gustav. The custom base was 10.75" lower than the original.
I didn't throw out the original base though, so it was just a matter of climbing over 300 bales of hay (without falling down) to retrieve the base and climb back over the same 300 bales of hay and bring it into the workshop.
After installing the original base, I figured that I had to move the bench, because there is a wall mounted cabinet that would interfere with the now higher bench, limiting its use.
So the small project expanded into moving my lathe and mounting the workbench in a new position. Some other day, I'll have to shift the tool board so it will be behind the bench again, but for now it is OK.

Regarding the tool chest for the sea, I finished the sharpening of the plane irons, and I tested the plane, and it was better than I had hoped for. I can still be fascinated by the capabilities of a real sharp plane iron.

I decided to try a trick that I was told by a friend regarding wooden hand planes. According to him it was customary practice once, to fill up a new plane with oil, and clamp it to a flat surface. Then the oil would seep into the wood and fill the pores from the inside. That way the friction of the sole of the plane could be reduced. I placed the plane without iron on a piece of glass, filled some oil into the mouth and clamped it down. Some of the oil has already seeped into the end grain, so I think it is working OK. I was informed that traditionally oil was added until it seeped out from around the button on the back of the plane.

The raised workbench in the new position.
The old custom base is in the foreground.

The plane filled with oil and clamped to a piece of glass.